
And I haven't cheated once. I've also flossed every day for 70 days.
I know that for you regular flossers this isn't that big of a deal. But I used to floss around once a week...after eating popcorn. So I'm quite pleased with my flossing self!
Anyway, my hope is that my 365 project will make me a better photographer. It's already made me a better Photoshop user.
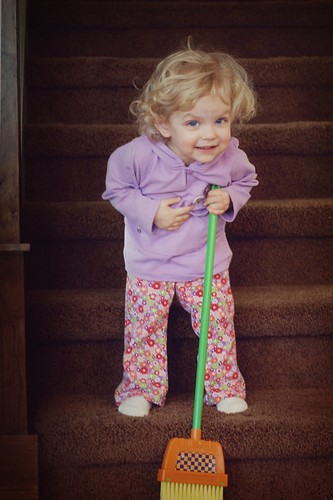
Take today's photo for example. I only took three pictures today. Wasn't in the mood for more. This was one of the three. The picture on the left is straight out of the camera. The picture on the right is tweaked. Now, if you aren't that interested in Photoshop or my tweaking process, feel free to think, "Cute picture" and move right along.

If you are interested, here was my process for this photo.
1. Open the photo is Camera Raw and try to remove the green color cast with the white color picker. Increase the exposure a bit and move the photo to Photoshop.
2. Move the photo to a new 4 x 6 size photo. Try like heck to straighten it while also keeping to the rule of thirds. Give up and just straighten it the best I can.
3. Run the Light exposure fix from Itty Bitty Actions, the sweet set. I love this action and use it a lot. It give the photo some pop and lets me darken some areas and lighten some areas.
4. I'm still not liking the overall coloring on the photo. My brown stairs have an ugly greenish look and so does Kylie's hair--due to the overhead lights and hardly any natural light hitting the stairway. So I run the Sweet Lavender action from ittybitty. It gives the photo this lovely purple cast. Look at the stairs on the right and you'll see what I mean. I play with the opacity of the three action layers until I'm happy.
5. I run the Vignette Smoother action which gives a very nice, subtle dark frame around the photo to draw the focus in. I use this action a lot too.
6. But I'm still not happy with the light bounce I'm getting from the stair banister on the left side of the photo. I run Pioneer Woman's Quick Edge Burn action and then move the burn out so it just covers the wood.
7. Then I run Pioneer Woman's Vintage action which on a opacity of 20% gives the overall picture that lovely softened look. I play around with erasing the action around Kylie's eyes which look so pretty in the original. But it just looks creepy so I keep the action on the whole thing.
8. I'm getting quite a lot of blur and the photo was blurry to begin with, so I run smart sharpen on a duplicate layer but then erase the sharpen from Kylie's face and hands and a bit of the stairs.
9. Take a deep breath and think about starting all over but then realize I'm not that in love with the picture. It's cute. I think I've made it a bit better. I'm done.
10. Take a big drink of Diet Coke and blog about it.


1 comment:
Beautiful! Oh how I wish I could afford the full current version of photoshop so I could run actions. Elements can do those things but they have to be done one at a time. :( Thanks for all the tips on sites, btw!
Post a Comment